| ||
| Manually configuring and passwordless ssh | ||
|---|---|---|
| Prev | Appendix E. Configuring the secure shell or the remote shell for communications | Next |
| ||
| Manually configuring and passwordless ssh | ||
|---|---|---|
| Prev | Appendix E. Configuring the secure shell or the remote shell for communications | Next |
The ssh program enables you to log into and execute commands on a remote system. ssh enables encrypted communications and an authentication process between two untrusted hosts over an insecure network.
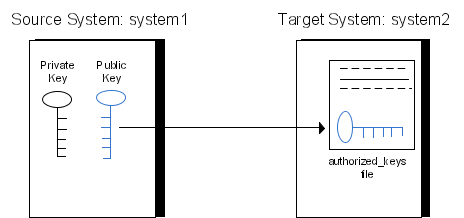
In this procedure, you first create a DSA key pair. From the key pair, you append the public key from the source system to the authorized_keys file on the target systems.
Figure: Creating the DSA key pair and appending it to target systems illustrates this procedure.
Read the ssh documentation and online manual pages before enabling ssh. Contact your operating system support provider for issues regarding ssh configuration.
Visit the OpenSSH website that is located at: http://openssh.org to access online manuals and other resources.
To create the DSA key pair
system1 # cd /
system1 # ssh-keygen -t dsa
System output similar to the following is displayed:
Generating public/private dsa key pair.
Enter file in which to save the key (//.ssh/id_dsa):
/.ssh/id_dsa.Enter passphrase (empty for no passphrase):
Do not enter a passphrase. Press Enter.
Enter same passphrase again:
Press Enter again.
/.ssh directory is on all the target installation systems (system2 in this example). If that directory is not present, create it on all the target systems and set the write permission to root only:system2 # mkdir /.ssh
Change the permissions of this directory, to secure it.
system2 # chmod go-w /.ssh
To append the public key from the source system to the authorized_keys file on the target system, using secure file transfer
To enable SFTP, the /etc/ssh/sshd_config file must contain the following two lines:
PermitRootLogin           yes
  Subsystem          sftp      /usr/lib/ssh/sftp-server
To restart ssh on Solaris 10, type the following command:
system1 # svcadm restart ssh
Use the secure file transfer program.
In this example, the file name id_dsa.pub in the root directory is the name for the temporary file for the public key.
Use the following command for secure file transfer:
system1 # sftp system2
If the secure file transfer is set up for the first time on this system, output similar to the following lines is displayed:
Connecting to system2 ...
The authenticity of host 'system2 (10.182.00.00)'
can't be established. DSA key fingerprint is
fb:6f:9f:61:91:9d:44:6b:87:86:ef:68:a6:fd:88:7d.
Are you sure you want to continue connecting (yes/no)?
Output similar to the following is displayed:
Warning: Permanently added 'system2,10.182.00.00'
(DSA) to the list of known hosts.
root@system2 password:
sftp> put /.ssh/id_dsa.pub
The following output is displayed:
Uploading /.ssh/id_dsa.pub to /id_dsa.pub
sftp> quit
system1 # ssh system2
Enter the root password of system2 at the prompt:
password:
authorized_keys file:system2 # cat /id_dsa.pub >> /.ssh/authorized_keys
system2 # rm /id_dsa.pub
system2 # exit
authorized_keys file. The installation can fail if the installation source system is not authenticated.To add the local system id_dsa.pub key to the local authorized_keys file, enter the following command:
system1 # cat /.ssh/id_dsa.pub >> /.ssh/authorized_keys
system1 # exec /usr/bin/ssh-agent $SHELL
system1 # ssh-add
Identity added: //.ssh/id_dsa
This shell-specific step is valid only while the shell is active. You must execute the procedure again if you close the shell during the session.
To verify that you can connect to a target system
system1 # ssh -l root system2 uname -a
where system2 is the name of the target system.