 | ||
| Configuring a SQL Server service group using the wizard | ||
|---|---|---|
| Prev | Configuring the SQL Server service group | Next |
| ||
| Configuring a SQL Server service group using the wizard | ||
|---|---|---|
| Prev | Configuring the SQL Server service group | Next |
This section describes how to configure a SQL service group using the configuration wizard.
The VCS SQL Server Agent Configuration Wizard is used to configure a service group for SQL Server 2008, 2008 R2, and 2012. You can configure a service group for only one SQL Server version at a time. To configure a service group for another SQL Server version, you must run the wizard again.
For a shared storage configuration, use the service group configuration wizard to configure the service group.
To create a SQL Server service group on the cluster
Complete the following:
In the Service Group Name field, specify a name for the SQL Server service group, for example, INST1_SG. If there are multiple instances, ensure that the name is unique within the cluster.
In the Available Cluster Systems box, select the systems on which to configure the service group and click the right-arrow to move the systems to the Systems in Priority Order list.
To change the priority of a system in the Systems in Priority Order list, select the system and click the up and down arrow icons. Arrange the systems in priority order as failover targets for the group. The server that needs to come online first must be at the top of the list.
For an active/active configuration, ensure that the active and failover systems are set differently for each instance. For example, if the system priority for the first instance is SYSTEM1, then SYSTEM2, the system priority for the second instance should be SYSTEM2, then SYSTEM1.
To enable the service group to automatically come online on one of the systems, select the Include selected systems in the service group's AutoStartList attribute checkbox.
For information about the AutoStartList attribute, see the Symantec Cluster Server Administrator's Guide.
Click Next.
From the SQL Server version drop-down list, select the SQL Server version for which you wish to configure the service group.
You can configure a service group for only one SQL Server version in a single wizard workflow. To configure another SQL Server version, you must run the wizard again.
The wizard displays instances of the selected SQL Server version that satisfy the following criteria:
Select the SQL Server instance(s) that you wish to configure in the service group.
If required, select the other services that you wish to make highly available. These options are available for selection only if the corresponding services are installed.
Note that you can choose only one instance of the Analysis service per service group. If you have selected an instance of Analysis service, you must uncheck it before you can select another instance of the Analysis service.
Note that services that are already configured and online in the cluster appear in bold and are not available for selection. You have to offline the service group and run the wizard in the modify mode to edit the service resources.
Select SQLFILESTREAM if you wish to configure high availability for FILESTREAM enabled database objects. The wizard configures a resource only if FILESTREAM is enabled for the instance on the current node.
Note that FILESTREAM option will not appear for selection if it is not enabled on the node.
Clear the Configure NetApp SnapMirror Resource(s) check box. This option is applicable only in case of a disaster recovery configuration. The SnapMirror resource is used to monitor replication between filers at the primary and the secondary site, in a disaster recovery configuration. If you are setting up a disaster recovery environment, check this check box to configure the SnapMirror resource at the primary site. Note that you must configure the SnapMirror resource only after you have configured replication between the NetApp filers.
In case of multiple instances, select the required instance from the SQL Instance dropdown list. The panel displays the databases and the respective files for which the wizard configures resources. Click a database name to view its database files.
Databases that appear with a red cross indicate that the wizard does not configure the storage agent resources for those items. These databases either do not reside on shared storage or the wizard is unable to locate them. If you wish to configure resources for these databases, ensure that the database are located on shared storage and then run the wizard again.
The SQL Cluster account must be configured if the SQL Server service and the SQL Server Agent service accounts do not have local administrator privileges on all the SQL Server nodes in the service group.
Complete the following steps for each SQL Server instance that you wish to configure in the service group:
Select a SQL instance from the Instance Name box.
Check the Configure SQL Server Cluster Account check box.
Click Use service SIDs to set the SQL Server service name as the SQL cluster account.
Click Use Domain Group Accountand then click the adjacent ellipsis button to launch the Windows Select Users, Computers, or Groups dialog box.
Then specify a domain group and click OK to set the domain group as the SQL cluster account.
If you specify a domain group as the SQL cluster account, ensure that the SQL Server service and SQL Server Agent service accounts are part of the specified domain group.
The SQL agent assigns the specified account with Full Control privileges to the SQL Server databases and log files. This ensures that they are accessible upon failover.
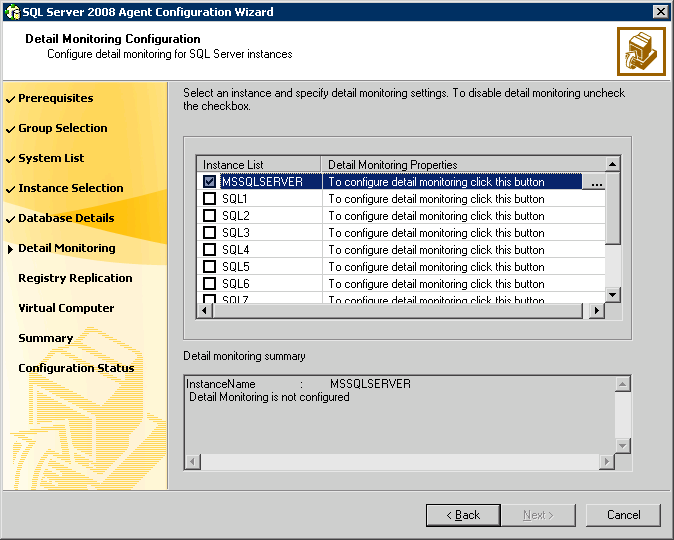
Perform the following steps only if you wish to configure detail monitoring for an instance:
Check the check box for a SQL instance, and then click the button from the Detail Monitoring Properties column to specify the detail monitoring settings.
Repeat these steps for each SQL Server instance that you wish to configure detail monitoring for.
Clear the check box to disable detail monitoring for the instance.
Click Next.
Symantec recommends that RegRep resources and SQL data be in separate volumes.
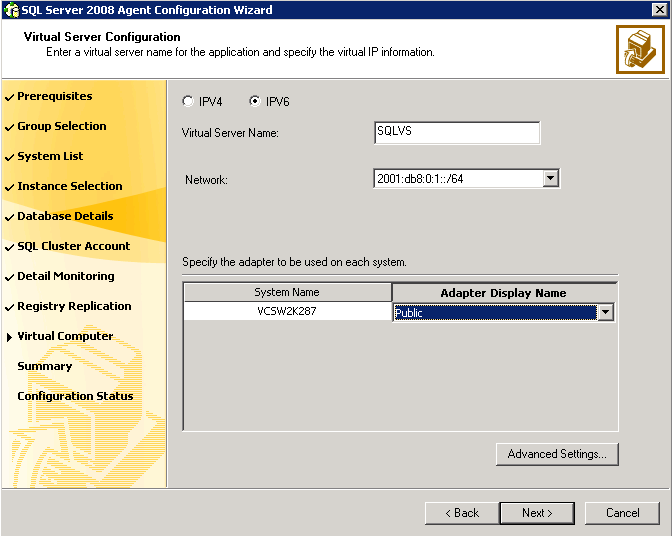
Select IPv4 to configure an IPv4 address for the virtual server.
Select IPv6 to configure an IPv6 address for the virtual server. The IPv6 option is disabled if the network does not support IPv6.
Enter the virtual name for the server, for example INST1-VS. Ensure that the virtual server name you enter is unique in the cluster.
For each system in the cluster, select the public network adapter name.
The Adapter Display Name field displays the TCP/IP enabled adapters on a system, including the private network adapters, if they are TCP/IP enabled. Make sure that you select the adapters to be assigned to the public network, and not those assigned to the private network.
If you require a computer object to be created in the Active Directory, click Advanced Settings, check the Active Directory Update required check box, specify the desired Organizational Unit (OU) in the domain and then click OK.
This sets the Lanman resource attributes ADUpdateRequired and ADCriticalForOnline to true. It allows the Lanman agent to update the Active Directory with the virtual server name.
You can type the OU details in the format CN=Computers,DC=domainname,DC=com. To search for an OU, click on the ellipsis button and specify the search criteria in the Windows Find Organization Unit dialog box.
By default, the Lanman resource adds the virtual server to the default container "Computers." The user account for VCS Helper service must have adequate privileges on the specified container to create and update computer accounts.
Click Next.
Note: |
If you have a tagged VLAN network configuration having multiple logical network interfaces or a teamed network interface that have the same MAC address, then you must edit the "MACAddress" attribute of the NIC agent and the IP agent, after you configure the application service group. See About the modifications required for tagged VLAN or teamed network. |
If you are configuring MPIO over FC, you must select at least 2 FC initiators for each cluster node. Note that the node from which you run this wizard already has an initiator selected by default. This is the initiator that was specified when you connected the LUNs to this cluster node.
To edit a resource name, click the resource name or press the F2 key. Press Enter after editing each resource name.
To cancel editing a resource name, press Esc.
You may want to review the service group configuration in the Cluster Manager (Java Console) before bringing the service group online. You can use the Cluster Manager to bring the service group online later.
You must bring the SQL service group online on the node from where you ran the configuration wizard. This is the first cluster node where you installed SQL Server. This allows the wizard to configure the resources required for SQL Server services.
The wizard marks all the resources in the service group as CRITICAL. If desired, use Cluster Manager (Java Console) or the command line to change the state.
If you have created a new SQL Server database, you must modify the SQL Server service group to add the required storage agent resources to the service group. Run the service group configuration wizard to modify the service group.
Click Finish to exit the wizard or click Next to configure another SQL service group or an MSDTC service group.
The wizard marks all the resources in the service group as CRITICAL. If desired, use Cluster Manager (Java Console) or the command line to change the state.
You can also configure an MSDTC service group.