 | ||
| Configuring the service group for the application | ||
|---|---|---|
| Prev | Installing the application | Next |
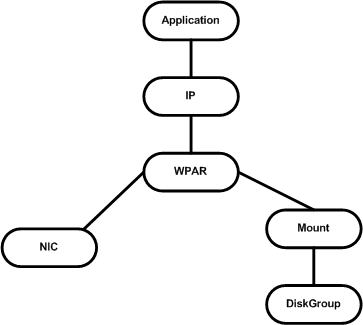
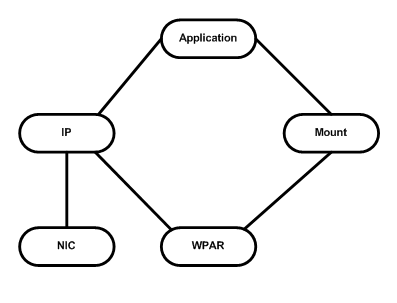
The following diagrams illustrates different examples of resource dependencies. In one case the WPAR root is set up on local storage. In the other, WPAR root is set up on shared storage.
Perform the following procedure to modify a service group's configuration.
To add a service group or modify the service group configuration
# /opt/VRTSvcs/bin/hawparsetup.pl servicegroup_name WPARres_name \
WPAR_name password systems
The command adds a resource of type WPAR to the application service group. It also creates a user account with group administrative privileges to enable WPAR to global communication.
If the application service group does not exist, the command creates a service group.
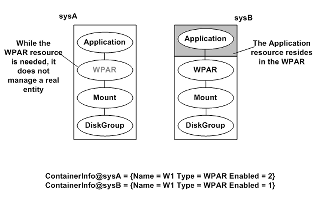
An application can be failed over from an LPAR to a WPAR running on a different LPAR. You can configure VCS to fail over from a physical system to a virtual system and vice versa. A physical to virtual failover gives an N + N architecture in an N + 1 environment. For example, several physical servers with applications can fail over to containers on another physical server. On AIX, a container is a WPAR.
In this configuration, you have two LPARs. One node runs AIX 7.1 (sysA) and another node that runs AIX 6.1 (sysB). The node that runs AIX 6.1 has WPARs configured.
In the main.cf configuration file, define the container name, type of container, and whether it is enabled or not. The following is an example of the ContainerInfo lines in the main.cf file:
ContainerInfo@sysA = {Name = W1, Type = WPAR, Enabled = 2}
ContainerInfo@sysB = {Name = W1, Type = WPAR, Enabled = 1}
On sysA, you set the value of Enabled to 2 to ignore WPARs so that the application runs on the physical system. When an application running on sysA fails over to sysB, the application runs inside the WPAR after the failover because Enabled is set to 1 on sysB. The application can likewise fail over to sysA from sysB.
IMF must be disabled on the node where Enabled is set to 2 (sysA in this example). To disable IMF, set the mode to 0.
On a Workload Partition (WPAR) where the WPAR is ignored to run the application on the physical system, you can disable the IMF for the WPARs.