 | ||
| Creating a dynamic volume | ||
|---|---|---|
| Prev | About creating dynamic volumes | Next |
Use the following to create a dynamic volume.
To create a new volume
You can also select the command from the Actions menu or click the New Volume tool on the toolbar.
Click Next to continue.
|
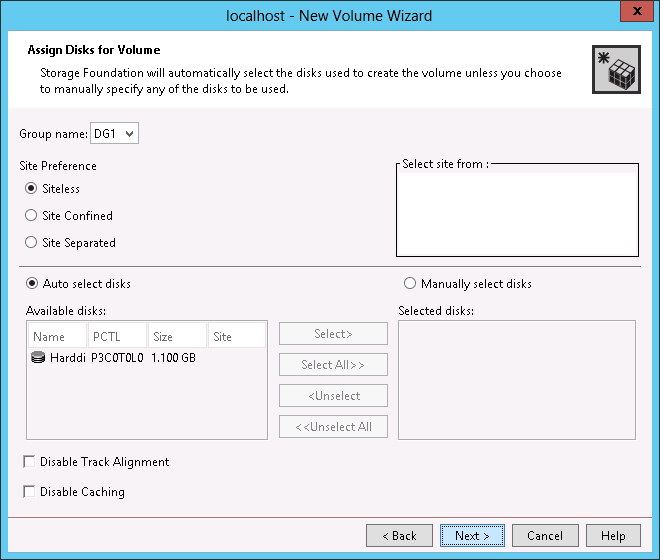
Group Name |
A default dynamic disk group appears in the Group name box. If you want to create the volume in a different dynamic disk group, select it from the drop-down list. |
|
Site Preference |
Specify the Site Preferences as Siteless, Site Confined, or Site Separated by enabling the required radio button against each of the respective options. For more information, See Administering volumes for site-based allocation . |
|
Select Site from |
Select the Site from the displayed list. If you have specified Site Confined as Site Preference, then you can select at the most one site or maximum one site from the displayed list of sites. If you have specified Site Separated as Site Preference, then you must specify at least two sites or more from the displayed list of sites. Press Ctrl on the keyboard to select multiple sites. If a single site is selected for a Site Separated volume, then an error message to select at least 2 sites is displayed. |
|
Auto Select Disks |
Automatically selecting disks is the default setting. Available disks are automatically assigned for volume creation. |
|
Manually select disks |
Select this option to manually select disk or disks. If you had selected one or more disks when you invoked the New Volume command, the disk selection method is set to manual. |
|
Disable Track Alignment |
You may also select Disable Track Alignment to disable track alignment for the volume. If you select this, then the volume does not store blocks of data in alignment with the boundaries of the physical track of the disk. For more information about Track Alignment, |
|
Disable Caching |
SmartIO is a feature of SFW that helps in improving I/O performance of applications and Hyper-V virtual machines by providing a read-only I/O cache created on Solid-State Devices (SSDs). Caching is enabled by default for a new volume. To disable caching on the volume, select the Disable Caching check box. |
Click Next to continue.
Click Next to continue.
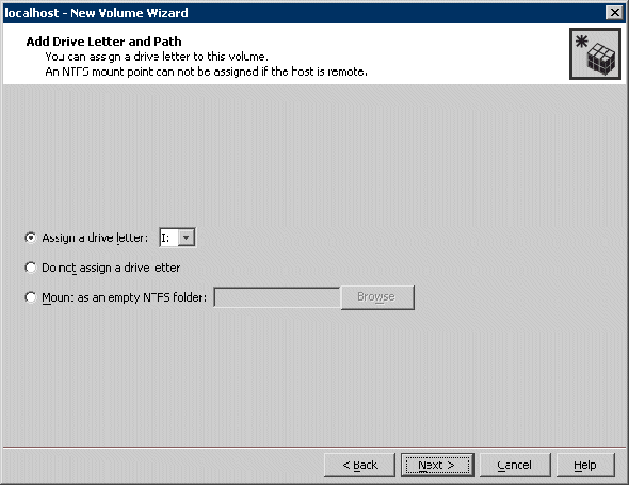
Note: |
For cluster-shared volumes, ensure that the selected drive letter for the new cluster-shared volume is available and not in use on any of the cluster nodes. |
|
Assign a drive letter |
Accept the default drive letter assignment or assign a drive letter by using the drop-down list. |
|
Do not assign a drive letter |
Select this option, if you may prefer to do this task later. |
|
Mount as an empty NTFS folder |
Select the option and provide a folder name or browse to select the folder name. This creates a new folder for you if you click the New Folder button in the Browse for Drive Path dialog box. |
Click Next to continue.
|
Format this volume |
Select this check box if you want to format the volume using NTFS, FAT, FAT32, or ReFS. You can undo the selection if you want to format the volume later. |
|
Select a file system |
Make sure the file system type that you want is highlighted if you want to format the volume now. |
|
Allocation size |
If required, change the allocation size. The default size is recommended. |
|
File system label |
If required, type a file system label. If you do not enter a label, no default label is provided. You can enter a label for the file system later. Select any of the following options:
|
If you want to format the volume, create a file system label, or change any of the volume settings, right-click the volume and select File System and the subcommand New File System from the volume context menu. You can make your choices from a panel that has the same selections as the one above.
Click Next to continue.
If you chose to format the volume, Storage Foundation begins the formatting process. Click the Tasks tab in the bottom left corner of the lower pane to see a text entry indicating the status and progress of the formatting process.
By default, the dynamic volume is created as a read/write volume. To make the dynamic volume a read-only volume, right-click the volume and check Read only in the Properties for the volume.