 | ||
| Configuring the cluster using the Cluster Configuration Wizard | ||
|---|---|---|
| Prev | Deploying InfoScale Enterprise for campus cluster | Next |
| ||
| Configuring the cluster using the Cluster Configuration Wizard | ||
|---|---|---|
| Prev | Deploying InfoScale Enterprise for campus cluster | Next |
After installing the software, set up the components required to run Cluster Server. The VCS Cluster Configuration Wizard (VCW) sets up the cluster infrastructure, including LLT and GAB, the user account for the VCS Helper service, and provides an option for configuring the VCS Authentication Service in the cluster. The wizard also configures the ClusterService group, which contains resources for notification and global clusters (GCO). You can also use VCW to modify or delete cluster configurations.
Note the following prerequisites before you proceed:
The required network adapters, and SCSI controllers are installed and connected to each system.
To prevent lost heartbeats on the private networks, and to prevent VCS from mistakenly declaring a system down, Veritas recommends disabling the Ethernet auto-negotiation options on the private network adapters. Contact the NIC manufacturer for details on this process. Veritas recommends removing Internet Protocol TCP/IP from private NICs to lower system overhead.
Verify that the public network adapters on each node use static IP addresses (DHCP is not supported) and name resolution is configured for each node.
Veritas recommends that you use three network adapters (two NICs exclusively for the VCS private network and one for the public network) per system. You can implement the second private link as a low-priority link over a public interface. Route each private NIC through a separate hub or switch to avoid single points of failure. Veritas recommends that you disable TCP/IP from private NICs to lower system overhead.
Use independent hubs or switches for each VCS communication network (GAB and LLT). You can use cross-over Ethernet cables for two-node clusters. GAB supports hub-based or switch network paths, or two-system clusters with direct network links.
Verify the DNS settings for all systems on which the application is installed and ensure that the public adapter is the first adapter in the Connections list.
When enabling DNS name resolution, make sure that you use the public network adapters, and not those configured for the VCS private network.
The logged on user must have local Administrator privileges on the system where you run the wizard. The user account must be a domain user account.
The logged on user must have administrative access to all systems selected for cluster operations. Add the domain user account to the local Administrator group of each system.
If you plan to create a new user account for the VCS Helper service, the logged on user must have Domain Administrator privileges or must belong to the Domain Account Operators group.
When configuring a user account for the Veritas VCS Helper service, make sure that the user account is a domain user. The Veritas High Availability Engine (HAD), which runs in the context of the local system built-in account, uses the Veritas VCS Helper service user context to access the network. This account does not require Domain Administrator privileges.
Make sure the VCS Helper service domain user account has "Add workstations to domain" privilege enabled in the Active Directory.
Verify that each system can access the storage devices and each system recognizes the attached shared disk.
Use Windows Disk Management on each system to verify that the attached shared LUNs (virtual disks) are visible.
If you plan to set up a disaster recovery (DR) environment, you must configure the wide-area connector process for global clusters.
If you are setting up a Replicated Data Cluster configuration, add only the systems in the primary zone (zone 0) to the cluster, at this time.
To configure a VCS cluster using the wizard
To discover information about all systems and users in the domain, do the following:
Clear Specify systems and users manually.
Click Next.
Proceed to step 8.
To specify systems and user names manually (recommended for large domains), do the following:
Select Specify systems and users manually.
Additionally, you may instruct the wizard to retrieve a list of systems and users in the domain by selecting appropriate check boxes.
Click Next.
If you chose to retrieve the list of systems, proceed to step 6. Otherwise, proceed to the next step.
Do not specify systems that are part of another cluster.
Proceed to step 8.
Do not select systems that are part of another cluster.
Enter the name of the system and click Add to add the system to the Selected Systems list, or click to select the system in the Domain Systems list and then click the > (right-arrow) button.
Select the system to see the validation details. If you wish to include a rejected system, rectify the error based on the reason for rejection and then run the wizard again.
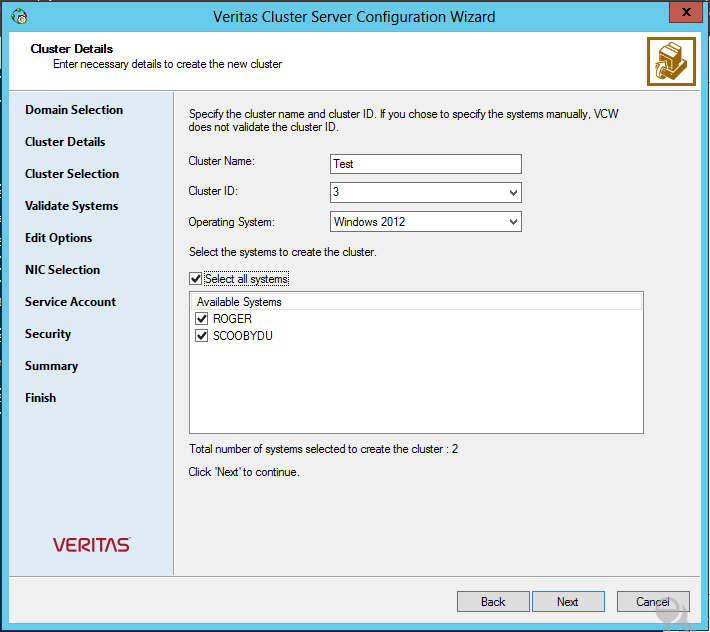
Specify the cluster details as follows:
|
Cluster Name |
Type a name for the new cluster. Veritas recommends a maximum length of 32 characters for the cluster name. |
||
|
Cluster ID |
Select a cluster ID from the suggested cluster IDs in the drop-down list, or type a unique ID for the cluster. The cluster ID can be any number from 0 to 65535.
|
||
|
Operating System |
From the drop-down list, select the operating system. All the systems in the cluster must have the same operating system and architecture. |
||
|
Available Systems |
Select the systems that you wish to configure in the cluster. Check the Select all systems check box to select all the systems simultaneously. The wizard discovers the NICs on the selected systems. For single-node clusters with the required number of NICs, the wizard prompts you to configure a private link heartbeat. In the dialog box, click Yes to configure a private link heartbeat. |
If a system is not validated, review the message associated with the failure and restart the wizard after rectifying the problem.
If you chose to configure a private link heartbeat in step 9, proceed to the next step. Otherwise, proceed to step 12.
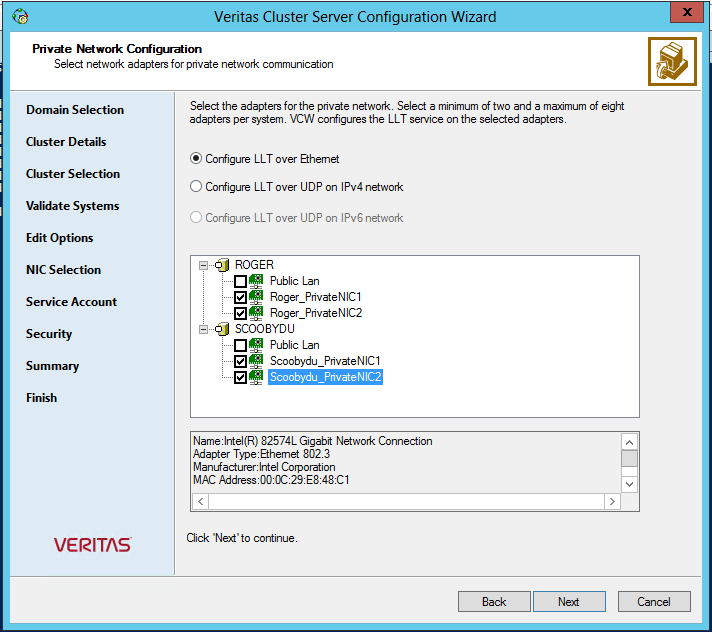
Select Configure LLT over Ethernet.
Select the check boxes next to the two NICs to be assigned to the private network. You can assign a maximum of eight network links.
Veritas recommends reserving two NICs exclusively for the private network. However, you could lower the priority of one of the NICs and use the low-priority NIC for both public and as well as private communication.
If there are only two NICs on a selected system, Veritas recommends that you lower the priority of at least one NIC that will be used for private as well as public network communication.
To lower the priority of a NIC, right-click the NIC and select Low Priority from the pop-up menu.
If your configuration contains teamed NICs, the wizard groups them as "NIC Group #N" where "N" is a number assigned to the teamed NIC. A teamed NIC is a logical NIC, formed by grouping several physical NICs together. All NICs in a team have an identical MAC address. Veritas recommends that you do not select teamed NICs for the private network.
The wizard configures the LLT service (over ethernet) on the selected network adapters.
To configure the VCS private network over the User Datagram Protocol (UDP) layer, complete the following steps:
Select Configure LLT over UDP on IPv4 network or Configure LLT over UDP on IPv6 network depending on the IP protocol that you wish to use.
The IPv6 option is disabled if the network does not support IPv6.
Select the check boxes next to the NICs to be assigned to the private network. You can assign a maximum of eight network links. Veritas recommends reserving two NICs exclusively for the VCS private network.
For each selected NIC, verify the displayed IP address. If a selected NIC has multiple IP addresses assigned, double-click the field and choose the desired IP address from the drop-down list. In case of IPv4, each IP address can be in a different subnet.
The IP address is used for the VCS private communication over the specified UDP port.
Specify a unique UDP port for each of the link. Click Edit Ports if you wish to edit the UDP ports for the links. You can use ports in the range 49152 to 65535. The default ports numbers are 50000 and 50001 respectively. Click OK.
For each selected NIC, double-click the respective field in the Link column and choose a link from the drop-down list. Specify a different link (Link1 or Link2) for each NIC. Each link is associated with a UDP port that you specified earlier.
The wizard configures the LLT service (over UDP) on the selected network adapters. The specified UDP ports are used for the private network communication.
The Veritas High Availability Engine (HAD), which runs in the context of the local system built-in account, uses the Veritas VCS Helper service user context to access the network. This account does not require Domain Administrator privileges.
Specify the domain user details as follows:
To specify an existing user, do one of the following:
Click Existing user and select a user name from the drop-down list.
If you chose not to retrieve the list of users in step 4, type the user name in the Specify User field and then click Next.
To specify a new user, click New user and type a valid user name in the Create New User field and then click Next.
Do not append the domain name to the user name; do not type the user name as Domain\user or user@domain.
In the Password dialog box, type the password for the specified user and click OK, and then click Next.
Do one of the following:
To use VCS cluster user privileges, click Use VCS User Privileges and then type a user name and password.
The wizard configures this user as a VCS Cluster Administrator. In this mode, communication between cluster nodes and clients, including Cluster Manager (Java Console), occurs using the encrypted VCS cluster administrator credentials. The wizard uses the VCSEncrypt utility to encrypt the user password.
The default user name for the VCS administrator is admin and the password is password. Both are case-sensitive. You can accept the default user name and password for the VCS administrator account or type a new name and password.
Veritas recommends that you specify a new user name and password.
To use the single sign-on feature, click Use Single Sign-on.
In this mode, the VCS Authentication Service is used to secure communication between cluster nodes and clients by using digital certificates for authentication and SSL to encrypt communication over the public network. VCS uses SSL encryption and platform-based authentication. The Veritas High Availability Engine (HAD) and Veritas Command Server run in secure mode.
The wizard configures all the cluster nodes as root brokers (RB) and authentication brokers (AB). Authentication brokers serve as intermediate registration and certification authorities. Authentication brokers have certificates signed by the root. These brokers can authenticate clients such as users and services. The wizard creates a copy of the certificates on all the cluster nodes.
The wizard configures the VCS private network. If the selected systems have LLT or GAB configuration files, the wizard displays an informational dialog box before overwriting the files. In the dialog box, click OK to overwrite the files. Otherwise, click Cancel, exit the wizard, move the existing files to a different location, and rerun the wizard.
The wizard starts running commands to configure VCS services. If an operation fails, click View configuration log file to see the log.
To configure the ClusterService group later, click Finish.
At this stage, the wizard has collected the information required to set up the cluster configuration. After the wizard completes its operations, with or without the ClusterService group components, the cluster is ready to host application service groups. The wizard also starts the VCS engine (HAD) and the Veritas Command Server at this stage.
Do the following:
Check the Notifier Option check box to configure notification of important events to designated recipients.
Check the GCO Option check box to configure the wide-area connector (WAC) process for global clusters.The WAC process is required for inter-cluster communication.
Configure the GCO Option using this wizard only if you are configuring a Disaster Recovery (DR) environment and are not using the Disaster Recovery wizard.
You can configure the GCO Option using the DR wizard. The Disaster Recovery chapters in the application solutions guides discuss how to use the Disaster Recovery wizard to configure the GCO option.
More Information