Recovery for Exchange 2010 using the VSS Restore Wizard

Using the VSS Restore Wizard, you can do the following:

Note:

If circular logging is enabled, you will not be able to roll forward a database to achieve a point-of-failure recovery. Microsoft does not recommend circular logging in production environments. Refer to the Microsoft Exchange Server documentation for further details.

Note:

Recovery Database for Exchange 2010 is not supported by SFW.

Before you begin, review the prerequisites.

See Prerequisites for recovery.

SFW automatically dismounts the stores before beginning the restore operation. If it fails to dismount the stores, the restore operation fails. In that case, manually dismount the stores. In the case of a VCS cluster setup, it offlines and onlines the resource for the database automatically. Manual intervention is required if the resource fails to offline automatically.

The VSS Restore Wizard helps you to restore a VSS snapshot of the mailbox database components using the snapshot set files. The mailbox database can be restored with the restore wizard. Before you proceed with the restore operation, ensure that you have prepared and created a snapshot set with VSS Snapshot Wizard or the vxsnap utility.

After completing the POF restore operation on a snapshot set file, you can refresh it by using either the VSS Snapback wizard or vxsnap reattach command to snapback any remaining database volumes. Then, you can use the VSS Exchange Snapshot Wizard or vxsnap create command to create a new snapshot set of the mailbox database.

For an Exchange 2010 database configured under VCS cluster, offline the corresponding VCS resource for the database manually before the restore operation, if the resource is not offlined automatically. Once the restore operation completes successfully, online the VCS resource. Specifying the -a option in the vxsnap restore command offlines and onlines the VCS resource automatically.

See Recovery for Exchange 2010 using the vxsnap utility.

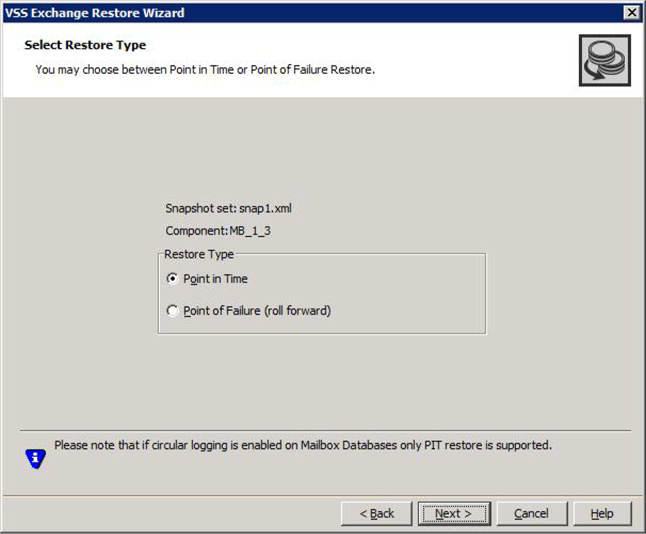
To restore Point in Time (PIT) snapshot set (Exchange 2010)

  1. On the server on which the storage group is located, launch Exchange Management Console from Start > All Programs > Microsoft Exchange Server 2010 > Exchange Management Console or, on Windows 2012 operating systems, from the Apps menu in the Start screen.
  2. In the console tree, expand Organization Configuration, and then click Mailbox.
  3. If replication is enabled for the selected database, you should first suspend continuous replication on this database. In the result pane, on the Database Management tab, select the database that you want to suspend.
  4. In the work pane, on the Database Copies tab, right-click the database for which you want to suspend continuous replication. Select Suspend Database Copy from the context menu. Click Yes to suspend continuous replication.
  5. From the work pane of the snap-in, right-click on the mailbox database and select Properties > Maintenance. Enable the checkbox This database can be overwritten by a restore option.
  6. Now proceed with the VSS restore operations on the selected mailbox database.

    Close the database application GUI, all Explorer windows, applications, consoles (except the VEA console), or third-party system management tools that may be accessing the snapshot volumes.

  7. From the VEA console, navigate to the system where the production volumes and snapshot set are located.
  8. Expand the system icon and the Applications node.
  9. Right-click Exchange and select VSS Restore from the context menu.
  10. Review the Welcome page. Click Next.
  11. Select the snapshot set you wish to restore and click Next.

    The XML metadata file contains all required information needed to restore the snapshot set, including the names of the database and transaction log volumes.

    Click the appropriate header to sort the list of available files by File Name or Creation Time.

  12. In the Select Restore Type panel, select Point in Time.

    Point in Time restores to the point-in-time that particular snapshot set was created or refreshed based on the information contained in the metadata file.

    Click Next.

  13. Verify that the restore specifications are correct on the summary page and Click Finish to exit the wizard.
  14. If you have suspended replication for your clustered mailbox database as shown in step 3, you should now update it from the work pane of the Exchange Management Console. In the work pane, on the Database Copies tab, right-click the mailbox database and select Update Database Copy.

To perform a roll forward recovery the point-of-failure (POF) (Exchange 2010)

  1. On the server on which the storage group is located, launch Exchange Management Console from Start > All Programs > Microsoft Exchange Server 2010 > Exchange Management Console or, on Windows 2012 operating systems, from the Apps menu in the Start screen.
  2. In the console tree, expand Organization Configuration, and then click Mailbox.
  3. If replication is enabled for the selected database, you should first suspend continuous replication on this database. In the result pane, on the Database Management tab, select the database that you want to suspend.
  4. In the work pane, on the Database Copies tab, right-click the database for which you want to suspend continuous replication. Select Suspend Database Copy from the context menu. Click Yes to suspend continuous replication.
  5. From the work pane of the snap-in, right-click on the mailbox database and select Properties > Maintenance. Enable the checkbox for This database can be overwritten by a restore option.
  6. Now proceed with the VSS restore operations on the selected mailbox database.

    Close the database application GUI, all Explorer windows, applications, consoles (except the VEA console), or third-party system management tools that may be accessing the snapshot volumes.

  7. From the VEA console, navigate to the system where the production volumes and snapshot set files are located.
  8. Expand the system icon and the Applications node.
  9. Right-click Exchange and select VSS Restore from the context menu.
  10. Review the information on the Welcome page and click Next.
  11. Select the name of the XML metadata file for the snapshot set you wish to restore and click Next.

    The XML metadata file contains all required information about the Exchange mailbox database, including the names of the database and transaction log volumes.

    Click the appropriate header to sort the list of available files by File Name or Creation Time.

  12. In the Select Restore Type Panel, select Point of Failure (roll forward).

    Roll forward restores the database to the most recent state before a failure occurred.

    Click Next.

  13. Verify the restore specifications on the summary page and click Finish to exit the wizard.
  14. If you have suspended replication for your clustered mailbox database as shown in step 3, you should now update it from the work pane of the Exchange Management Console. In the work pane, on the Database Copies tab, right-click the mailbox database and select Update Database Copy.