 | ||
| Installation tasks for Oracle using ASM | ||
|---|---|---|
| Prev | About Oracle installation tasks for VCS | Next |
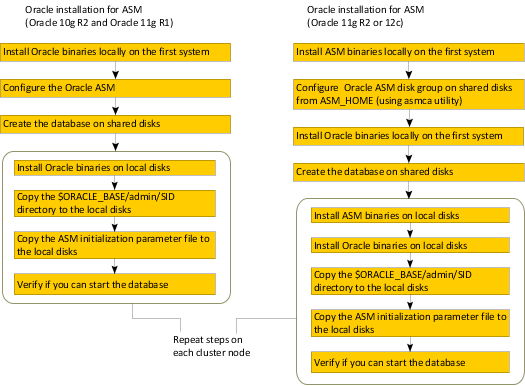
Figure: Installation flow for Oracle ASM illustrates the flow of the installation when you want to use ASM for the Oracle database. The installation flow differs if you use Oracle 11g R2.
The methodology is to perform the following:
Install the Oracle and the ASM binaries on the local disk, configure the ASM, and to create the Oracle database on ASM disk groups during the first installation.
Then, install the Oracle and the ASM binaries on local disks of other nodes.
This methodology ensures that all Oracle installations are identical and access the database from the same location.
Table: Installation tasks for $ORACLE_HOME on local disks (for Oracle 10g R2 or Oracle 11g R1) lists the tasks to install Oracle and ASM (for Oracle 10g R2 or Oracle 11g R1) such that $ORACLE_HOME is on local disks.
Table: Installation tasks for $ORACLE_HOME on local disks (for Oracle 10g R2 or Oracle 11g R1)
|
Task |
Reference |
|---|---|
|
On the first node in the cluster, install Oracle binaries on the local disk. Enable the Oracle clustering daemon for Oracle 10g and later. |
See Installing Oracle binaries on the first node of the cluster. See Enabling the clustering daemon for ASM-managed database. |
|
From the first node where you installed Oracle, configure the Oracle ASM. |
|
|
From the first node where you installed Oracle, create the database on ASM disk groups. |
|
|
On each node in the cluster, perform the following tasks:
|
See Installing Oracle binaries on the first node of the cluster. See Copying the $ORACLE_BASE/admin/SID directory. |
Table: Installation tasks for $ORACLE_HOME on local disks (for Oracle 11gR2 or 12c) lists the tasks to install Oracle and ASM (for Oracle 11g R2 or 12c) such that $ORACLE_HOME is on local disks.
Table: Installation tasks for $ORACLE_HOME on local disks (for Oracle 11gR2 or 12c)
|
Task |
Reference |
|---|---|
|
On the first node in the cluster, install ASM binaries on the local disk. |
|
|
From the first node where you installed ASM, configure Oracle ASM disk groups on shared disks (using asmca utility). |
|
|
On the first node in the cluster, install Oracle binaries on the local disk. Enable the Oracle clustering daemon for Oracle 10g and later. Enable automatic start up of Oracle Cluster Synchronization Service daemon for Oracle 11g R2 |
See Installing Oracle binaries on the first node of the cluster. See Enabling the clustering daemon for ASM-managed database. See Enabling Oracle Cluster Synchronization Service daemon to start automatically. |
|
From the first node where you installed Oracle, create the database on ASM disk groups. |
|
|
On each node in the cluster, perform the following tasks:
|
See Installing Oracle binaries on the first node of the cluster. See Copying the $ORACLE_BASE/admin/SID directory. |